CNAT - General Info

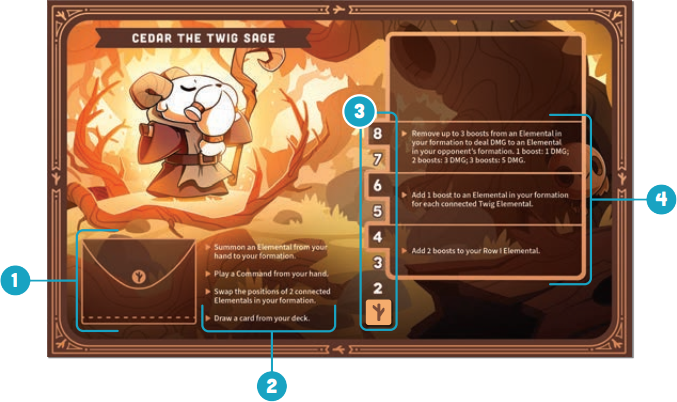
The left side of your Sage board features your wallet (1), where you will keep your gold you have collected throughout the game. It also includes a hand list of your standard actions (2) for quick reference. On the right side of your Sage board, you will find your level tracker (3). Each time you defeat an Elemental in your opponent's formation, increase your level by 1 by moving your level tracker up along your level tracker. Each time your level reaches a set threshold (4, 6, and 8), you gain access to a powerful Elemental Champion and new faction action (4).
- Elemental Champions: Elemental Champions are powerful Elementals that are unique to each faction. When you reach a threshold onn your level tracker, move the corresponding Elemental Champion from your Sage board to the top of your discard pile. Doing so will reveal a faction action on your Sage board.
- Faction actions: Once you unlock a faction action by revealing it on your Sage board, you may perform that action for the remainer of the game during Phase II of your turn by spending 1 AP. As a reminder, you may only perform one faction action per turn.
Once you reach level 8 on your level tracker, you have reached your maximum level and unlocked all available Elemental Champions and faction actions.
![]()
There are 4 sages in the base game and 2 in the Sand and Wind expansion. Each sage leads an Elemental faction that comes with its own unique gameplay style:
- Pebble: The Pebble faction focuses on defense with shield generation.
- Droplet: The Droplet faction focuses on card advantage and formation manipulation with a balance between offense and defense.
- Twig: The Twig faction focuses on offense with boosted damage.
- Leaf: The Leaf faction focuses on deck and discard manipulation with a balance between offense and defense.
- Sand: The Sand faction takes a slow and steady approach, maneuvering coarse grains of sand with their magic to control the match and deal damage over time.
- Wind: The Wind faction moves swiftly, creating a whirlwind by moving Elementals within a formation to gain advantage.
![]()
ELEMENTALS
Throughtout the game, you'll summon Elementals into your formation. when you summon an Elemental, place it in the frontmost row that has an empty space in your formation. For example, if you have an empty space in Row II, you cannot summon an Elemental in Row III.

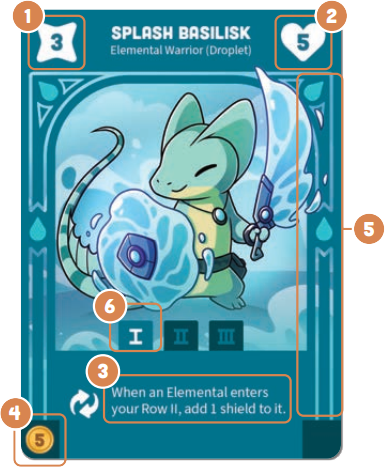
Each Elemental has two stats: strength (STR) (1) and health (HP) (2). You'll use the STR stat when calculating damage (DMG) during combat, and HP represents the amount of DMG your Elemental can withstand before it is defeated. Each Elemental Warrior, Champion, and Sage also has an effect (3) near the bottom of its card. Elementals in the Elemental Market display their cost (4) on the bottom left corner. Finally, each Elemental has a symbol and border (5) representing its faction. In order to use an Elemental Warrior or Champion's effect, you must position that Elemental in a corresponding row (6)in your formation, as shown above the effect on each Elemental Warrior and Champion.
ELEMENTALS COME IN FOUR TYPES:
- Elemental Sages: Your Sage is the leader of your formation. If you have no Sage in your formation, you lose the game.
- Basic Elementals: These Elementals have no effect, but you can still use them during combat. Your Sage pack comes with 4 Basic Elementals, and you can purchase additional Basic Elementals from the Elemental Market.
- Elemental Warriors: These Elementals have effects that you can use when they are positioned in certain wors in your formation. Your Sage pack comes with 3 Elemental Warriors, and you can purchase additional Elemental Warriors from the Elemental Market.
- Elemental Champions: These are extremely powerful Elementals. Like Elemental Warriors, Elemental Champions have effects that you can use when they are positioned in certain rows in your formation. You may only access Elemental Champions by defeating Elementals in your opponent's formation to reach the corresponding level threshold on your level tracker.
ELEMENTAL EFFECTS COME IN TWO TYPES:
 Daybreak Effects can only be used during Phase I of your turn. You can use each daybreak effect once per turn, and you can use them in any order.
 Triggered Effects can be used in response to specific occurences throughout the game. Each triggered effect notes when you can use it in its card text.
COMMANDS Throughout the game, you'll play Commands to gain strategic advantages, protect your Elementals, and deal DMG to cards in your opponent's formation. To play a Command, reveal it and use its effect, then place it in your discard pile.
COMMANDS COME IN FOUR TYPES:
Your Sage pack includes all four types of Commands (three for retail), and you can buy additional Commands from the Command Market.
![]()
TOKENS COME IN FOUR TYPES:
Example 1: If an Elemental in your formation has 3 shields and your opponent would deal 4 DMG with an attack, remove all 3 shields from your Elemental; your Elemental takes 1 DMG.
Example 2: If an Elemental in your formation has 3 shields and your opponent would deal 1 DMG with an attack, remove all 3 shields from your Elemental; your Elemental takes 0 DMG.
Note: An Elemental in your formation can have any number of boosts and shields on it.
![]()
During your turn, you'll initiate combat by playing an Attack Command. Your opponent has a chance to respond by playing any number of Instant Commands to reduce DMG or gain an advantage in some other way.
To calculate DMG from an attack, start with the DMG described in the effect of your Attack Command, then add 1 DMG for each boost on your attacking Elemental. Subtract any DMG reduced by Instant Commands your opponent plays, then subtract 1 DMG for each shield on your opponent's Elemental that your Elemental attacked. If the calculated DMG is greater then 0, add damage counters to your opponent's Elemental equal to the DMG dealt. Remove all boosts from your attacking Elemental and all shields from your opponent's attacked Elemental (if applicable).
If at any time the amount of DMG on an Elemental equals or exceeds that card's HP, that Elemental is defeated. If an Elemental in your formation is defeated, do not add it to your discard pile; instead, return it to the game box to remove it from the game. Return any tokens on that Elemental to the corresponding token pile in the center of the table.
Note: Each time you defeat an Elemental in your opponent's formation, increase your level by 1 on your level tracker. If you're playing with 4 players and you defeat an Elemental in your opponent's faction by attacking with an Elemental on your team's formation, only you increase your level by 1 on your level tracker; your teammate does not increase their level, even if you used an Elemental in their half of your team's formation to attack.
If an Elemental in your formation is defeated, it leaves an empty space, and you might have to shift your formation before gameplay can resume. If an Elemental is defeated in Row I of your formation and you have at least 1 Elemental in Row II, you must move and Elemental from Row II to Row I to fill that spave. Likewise, if you have an empty space in Row II and have at least 1 Elemental in Row III, you must move an Elemental from Row III to fill that space if possible. Continue this process until Row I and Row II have no empty spaces (or you have no available Elementals to move into those spaces. In short, you cannot leave spaces in your frontmost rows id you have additional Elementals (including your Sage) in rows farther back in your formation.
If you're playing with 2 players: If your Sage is defeated, you lose the game.
If you're playing with 4 players: If your Sage is defeated but your teammate's Sage is not, you may continue playing; however, you cannot use any faction actions or increase your level on your level tracker for the remainder of the game.
![]()
Once you've tasted sweet victory or bitter defeat, it's time to pack up! While the Master(s) of the Elements gloat, the defeated player(s) must follow these clean-up steps to make the next match easier to set up:
- Return any cards in the game box to the center of the table.
- Collect all cards from your Sage pack and place them in a pile.
- Collect all cards from your opponent's Sage pack and place them in a pile.
- Return all Elemental Market cards to the Elemental Market deck, then place it in the left compartment of the game box.
- Return all Command Market cards to the Command Market deck, then place it in the right compartment of the game box.
- Place the Sage packs in the game box on top of the market decks.
- Place all tokens in their respective compartments.
- Finally, place all Sage boards on top, place the rule book on top of the Sage boards, then close the box.


